mTLS and L7 observability with Istio#
This integration guide for KubeRay and Istio enables mTLS and L7 traffic observability in a RayCluster on a local Kind cluster.
Istio#
Istio is an open-source service mesh that provides a uniform and more efficient way to secure, connect, and monitor services. Some features of its powerful control plane include:
Secure network traffic in a Kubernetes cluster with TLS encryption.
Automatic metrics, logs, and traces for all traffic within a cluster.
See the Istio documentation to learn more.
Step 0: Create a Kind cluster#
Create a Kind cluster with the following command:
kind create cluster
Step 1: Install Istio#
# Download Istioctl and its manifests.
export ISTIO_VERSION=1.21.1
curl -L https://istio.io/downloadIstio | sh -
cd istio-1.21.1
export PATH=$PWD/bin:$PATH

# Install Istio with:
#   1. 100% trace sampling for demo purposes.
#   2. "sanitize_te" disabled for proper gRPC interception. This is required by Istio 1.21.0 (https://github.com/istio/istio/issues/49685).
#   3. TLS 1.3 enabled.
istioctl install -y -f - <<EOF
apiVersion: install.istio.io/v1alpha1
kind: IstioOperator
spec:
  meshConfig:
    defaultConfig:
      tracing:
        sampling: 100
      runtimeValues:
        envoy.reloadable_features.sanitize_te: "false"
    meshMTLS:
      minProtocolVersion: TLSV1_3
EOF

# Install Istio addons, including the Kiali and Jaeger dashboards.
kubectl apply -f samples/addons
# Enable the Istio sidecar auto injection.
kubectl label namespace default istio-injection=enabled
See Istio Getting Started for more details on installing Istio.
Step 2: Install the KubeRay operator#
Follow Deploy a KubeRay operator to install the latest stable KubeRay operator from the Helm repository.
Step 3: (Optional) Enable Istio mTLS STRICT mode#
This optional step enables Istio mTLS in STRICT mode, which provides the best security of service mesh by rejecting all undefined traffic.
In this mode, you must disable the KubeRay init container injection by setting ENABLE_INIT_CONTAINER_INJECTION=false on the KubeRay controller. This setting is necessary because the init container starts before the istio-proxy, resulting in the rejection of all of its network traffic in STRICT mode.
# Set ENABLE_INIT_CONTAINER_INJECTION=false on the KubeRay operator.
helm upgrade kuberay-operator kuberay/kuberay-operator --version 1.1.0 \
  --set env\[0\].name=ENABLE_INIT_CONTAINER_INJECTION \
  --set-string env\[0\].value=false

# Apply mTLS STRICT mode on Istio.
kubectl apply -f - <<EOF
apiVersion: security.istio.io/v1beta1
kind: PeerAuthentication
metadata:
  name: "default"
  namespace: "default"
spec:
  mtls:
    mode: STRICT
EOF
See Istio Mutual TLS Migration for more information about STRICT mode.
Step 4: Apply a Headless service for the upcoming RayCluster#
To let Istio learn the L7 information of the upcoming RayCluster, you must apply a Headless service for it.
kubectl apply -f - <<EOF
apiVersion: v1
kind: Service
metadata:
  labels:
    ray.io/headless-worker-svc: raycluster-istio
  name: raycluster-istio-headless-svc
  namespace: default
spec:
  clusterIP: None
  selector:
    ray.io/cluster: raycluster-istio
  publishNotReadyAddresses: true
  ports:
  - name: node-manager-port
    port: 6380
    appProtocol: grpc
  - name: object-manager-port
    port: 6381
    appProtocol: grpc
  - name: runtime-env-agent-port
    port: 6382
    appProtocol: grpc
  - name: dashboard-agent-grpc-port
    port: 6383
    appProtocol: grpc
  - name: dashboard-agent-listen-port
    port: 52365
    appProtocol: http
  - name: metrics-export-port
    port: 8080
    appProtocol: http
  - name: p10002
    port: 10002
    appProtocol: grpc
  - name: p10003
    port: 10003
    appProtocol: grpc
  - name: p10004
    port: 10004
    appProtocol: grpc
  - name: p10005
    port: 10005
    appProtocol: grpc
  - name: p10006
    port: 10006
    appProtocol: grpc
  - name: p10007
    port: 10007
    appProtocol: grpc
  - name: p10008
    port: 10008
    appProtocol: grpc
  - name: p10009
    port: 10009
    appProtocol: grpc
  - name: p10010
    port: 10010
    appProtocol: grpc
  - name: p10011
    port: 10011
    appProtocol: grpc
  - name: p10012
    port: 10012
    appProtocol: grpc
EOF
Note that this Headless Service manifest must list all the ports used by Ray explicitly, including all worker ports. See Configuring Ray for more details on the ports required by Ray.
Note
Kubernetes Service doesn’t support specifying ports in ranges. You must set them one by one.
Warning
The default Ray worker port range, from 10002 to 19999, is too large to specify in the service manifest and can cause memory issues in Kubernetes. Set a smaller max-worker-port to work with Istio.
Step 4: Create the RayCluster#
The upcoming RayCluster must use exactly the same ports listed in the previous Headless Service, including the max-worker-port.
In addition, the node-ip-address must be set to the Pod FQDN of the Headless Service to enable Istio L7 observability.
kubectl apply -f - <<EOF
apiVersion: ray.io/v1
kind: RayCluster
metadata:
  name: raycluster-istio
spec:
  rayVersion: '2.10.0'
  headGroupSpec:
    rayStartParams:
      num-cpus: '1'
      node-manager-port: '6380'
      object-manager-port: '6381'
      runtime-env-agent-port: '6382'
      dashboard-agent-grpc-port: '6383'
      dashboard-agent-listen-port: '52365'
      metrics-export-port: '8080'
      max-worker-port: '10012'
      node-ip-address: \$(hostname -I | tr -d ' ' | sed 's/\./-/g').raycluster-istio-headless-svc.default.svc.cluster.local
    template:
      spec:
        containers:
        - name: ray-head
          image: rayproject/ray:2.10.0-aarch64
  workerGroupSpecs:
    - replicas: 1
      minReplicas: 1
      maxReplicas: 1
      groupName: small-group
      rayStartParams:
        num-cpus: '1'
        node-manager-port: '6380'
        object-manager-port: '6381'
        runtime-env-agent-port: '6382'
        dashboard-agent-grpc-port: '6383'
        dashboard-agent-listen-port: '52365'
        metrics-export-port: '8080'
        max-worker-port: '10012'
        node-ip-address: \$(hostname -I | tr -d ' ' | sed 's/\./-/g').raycluster-istio-headless-svc.default.svc.cluster.local
      template:
        spec:
          containers:
          - name: ray-worker
            image: rayproject/ray:2.10.0-aarch64
EOF
kubectl apply -f - <<EOF
apiVersion: ray.io/v1
kind: RayCluster
metadata:
  name: raycluster-istio
spec:
  rayVersion: '2.10.0'
  headGroupSpec:
    rayStartParams:
      num-cpus: '1'
      node-manager-port: '6380'
      object-manager-port: '6381'
      runtime-env-agent-port: '6382'
      dashboard-agent-grpc-port: '6383'
      dashboard-agent-listen-port: '52365'
      metrics-export-port: '8080'
      max-worker-port: '10012'
      node-ip-address: \$(hostname -I | tr -d ' ' | sed 's/\./-/g').raycluster-istio-headless-svc.default.svc.cluster.local
    template:
      spec:
        containers:
        - name: ray-head
          image: rayproject/ray:2.10.0
  workerGroupSpecs:
    - replicas: 1
      minReplicas: 1
      maxReplicas: 1
      groupName: small-group
      rayStartParams:
        num-cpus: '1'
        node-manager-port: '6380'
        object-manager-port: '6381'
        runtime-env-agent-port: '6382'
        dashboard-agent-grpc-port: '6383'
        dashboard-agent-listen-port: '52365'
        metrics-export-port: '8080'
        max-worker-port: '10012'
        node-ip-address: \$(hostname -I | tr -d ' ' | sed 's/\./-/g').raycluster-istio-headless-svc.default.svc.cluster.local
      template:
        spec:
          containers:
          - name: ray-worker
            image: rayproject/ray:2.10.0
EOF
Note
The Pod FQDN of the Headless service should be in the format of pod-ipv4-address.service.namespace.svc.zone. or the format of pod-hostname.service.namespace.svc.zone. depending on your implementation of the Kubernetes DNS specification.
Step 5: Run your Ray app to generate traffic#
After the RayCluster is ready, use the following script to generate internal traffic for visualization.
export HEAD_POD=$(kubectl get pods --selector=ray.io/node-type=head -o custom-columns=POD:metadata.name --no-headers)
kubectl exec -it $HEAD_POD -- python -c "import ray; ray.get([ray.remote(lambda x: print(x)).remote(i) for i in range(5000)])"
Step 6: Verify the auto mTLS and L7 observability#
Run the following command to start the Kiali dashboard:
istioctl dashboard kiali
Go to the raycluster-istio workload at: http://localhost:20001/kiali/console/namespaces/default/workloads/raycluster-istio?duration=60&refresh=60000&tab=info
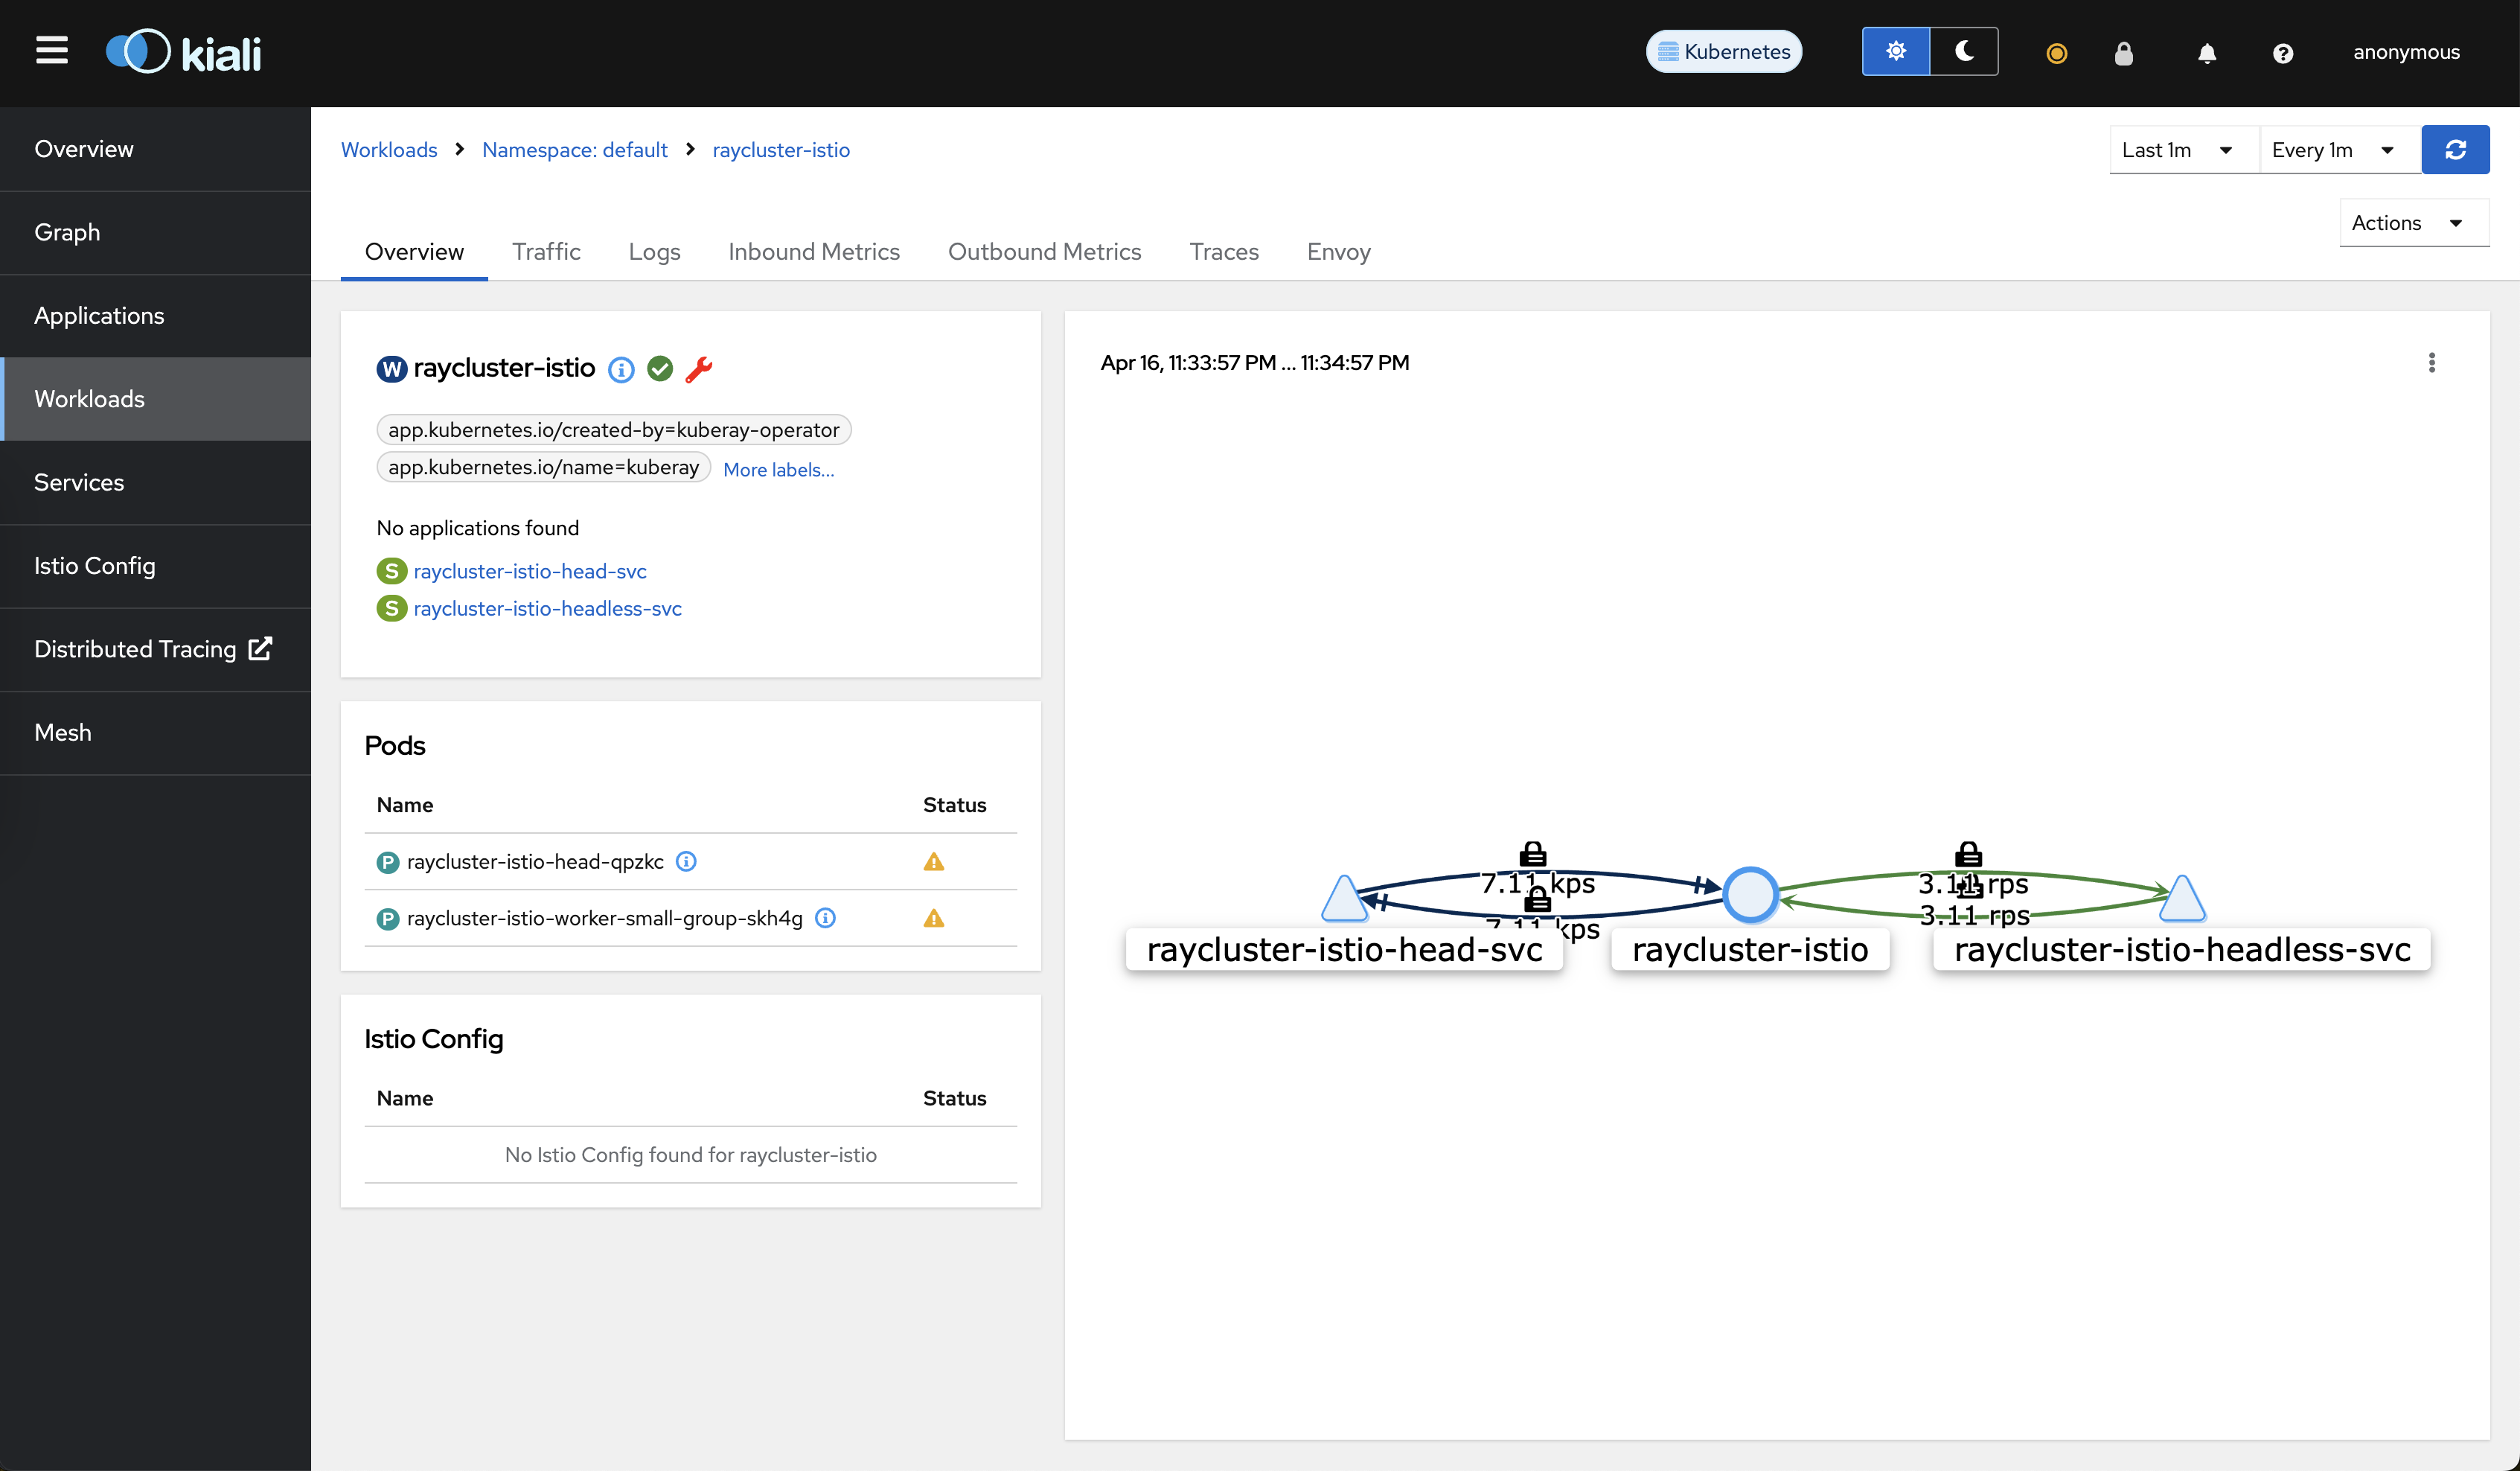
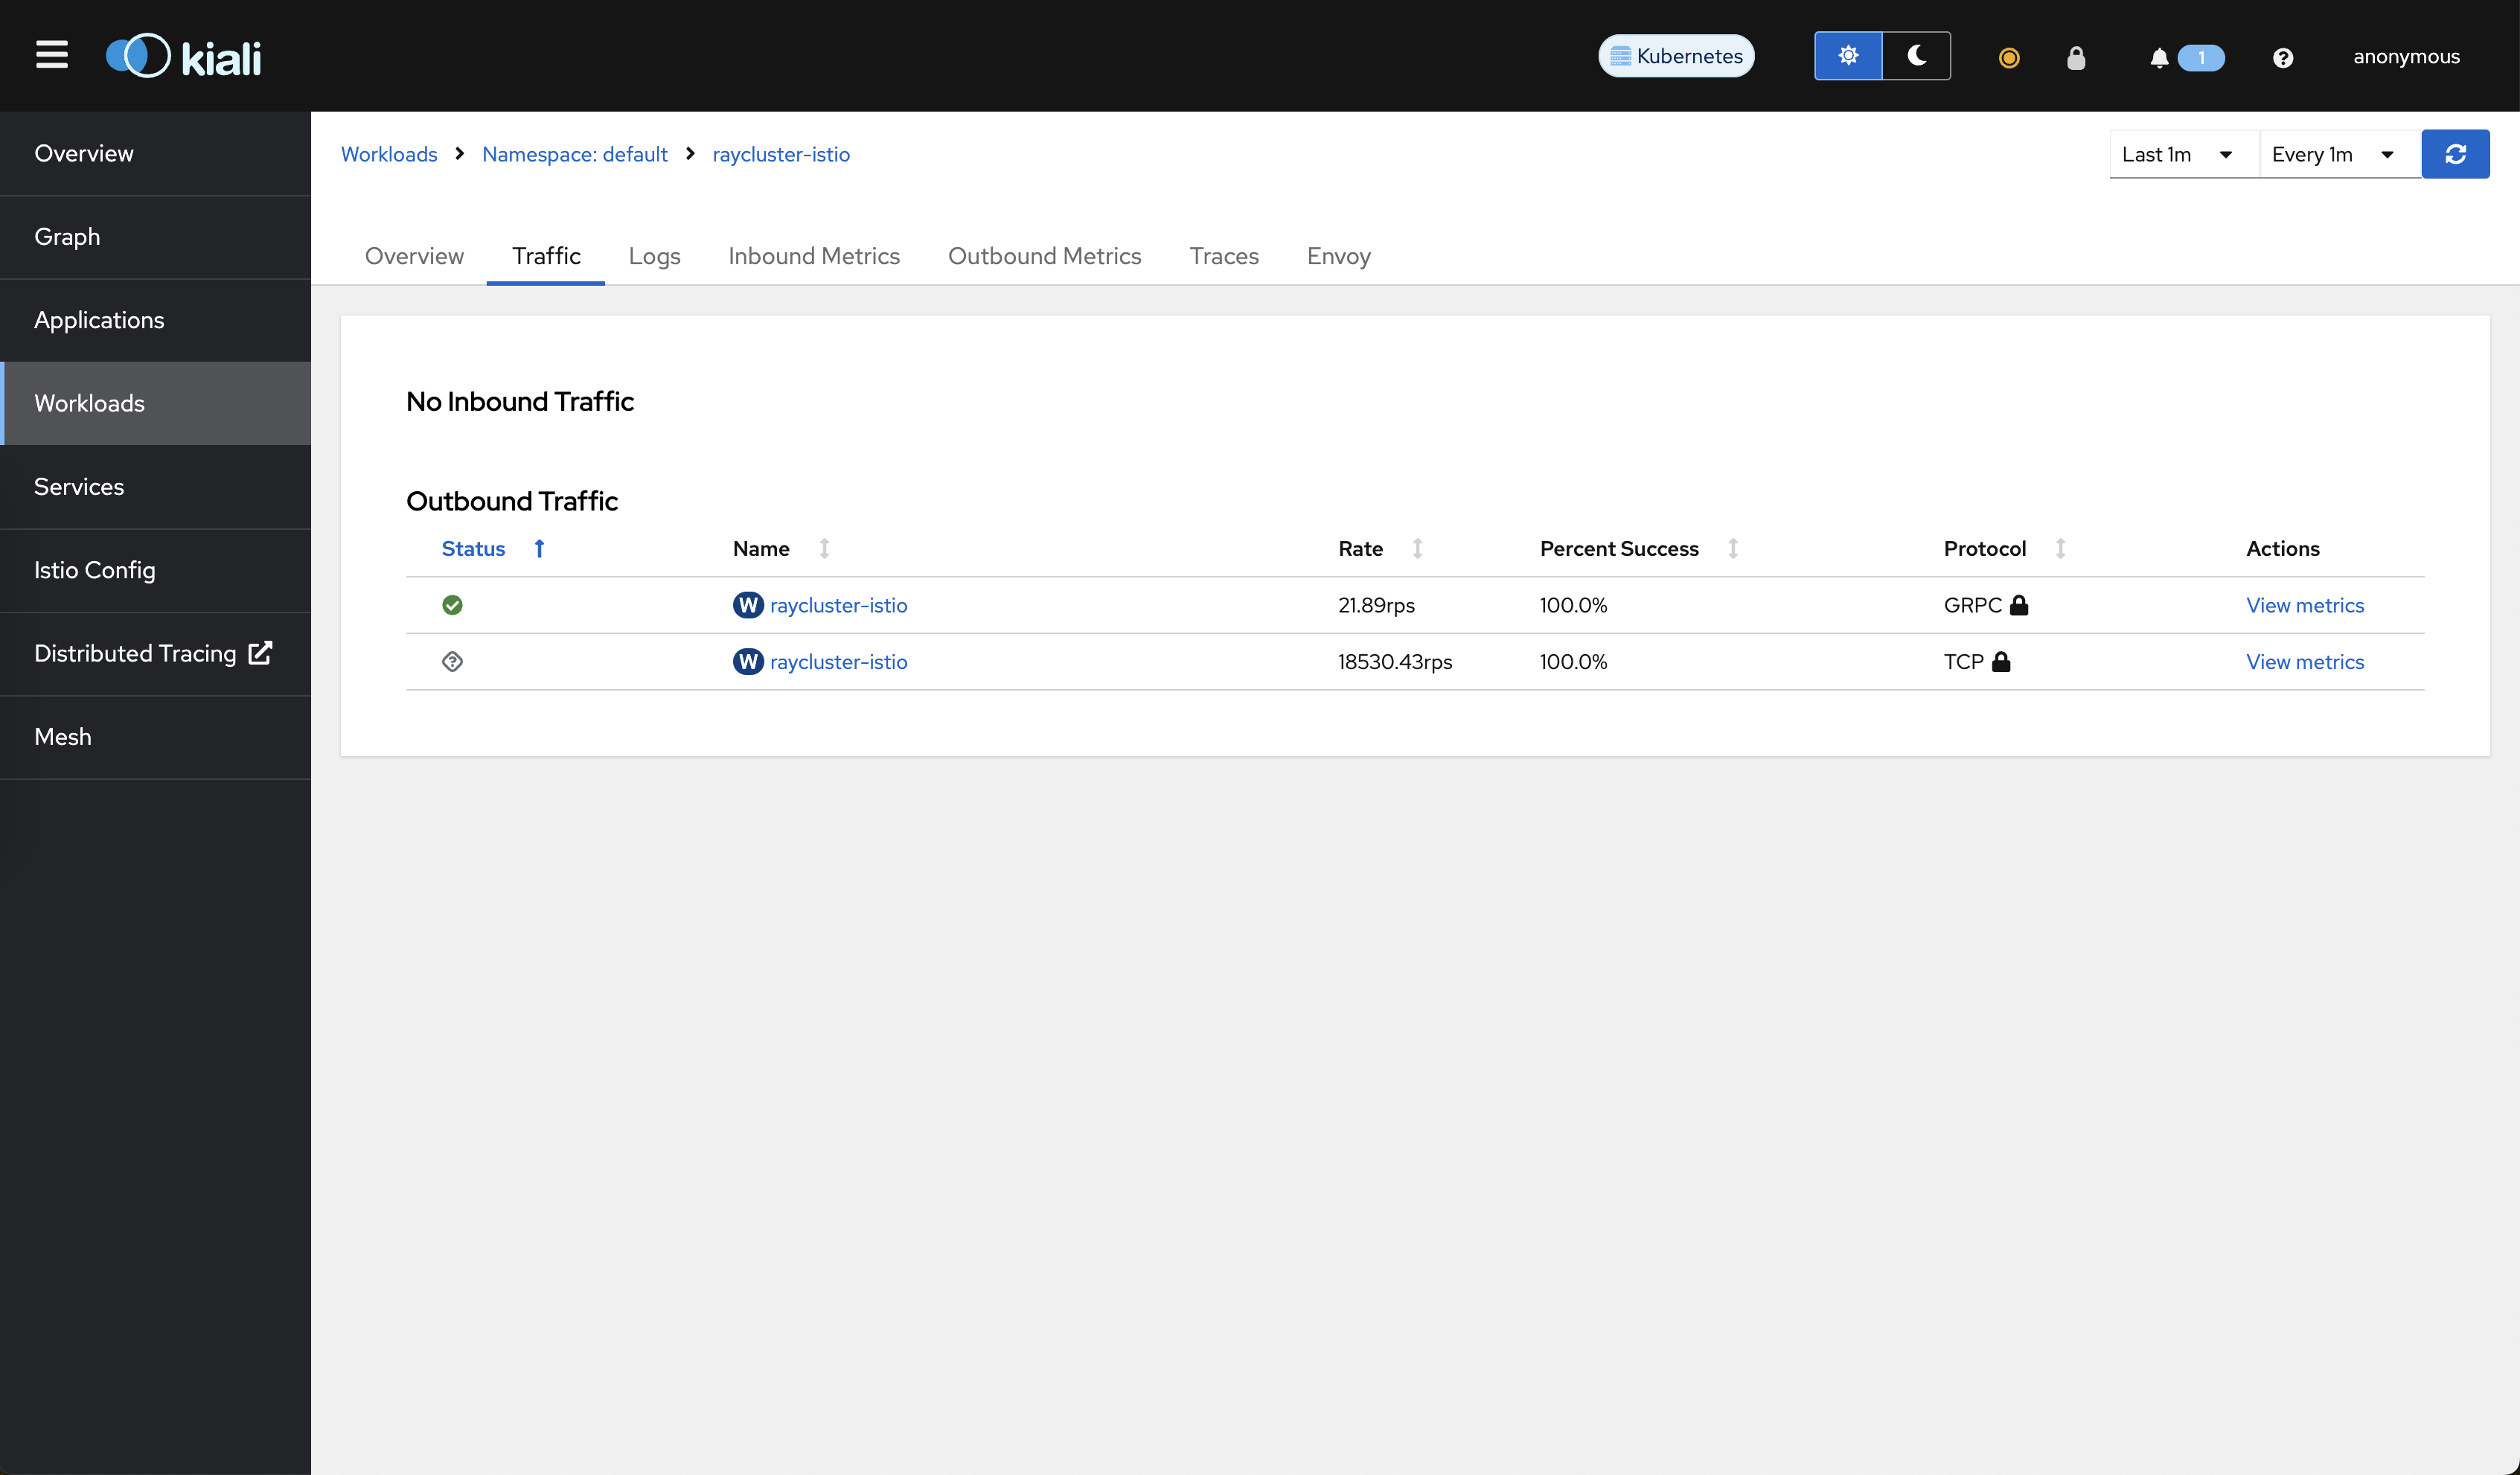
Go to the Traffic tab. You can see that mTLS protects all of the traffic.
Run the following command to start the Jaeger dashboard:
istioctl dashboard jaeger
Go to the Jaeger dashboard with the service=raycluster-istio.default query: http://localhost:16686/jaeger/search?limit=1000&lookback=1h&maxDuration&minDuration&service=raycluster-istio.default
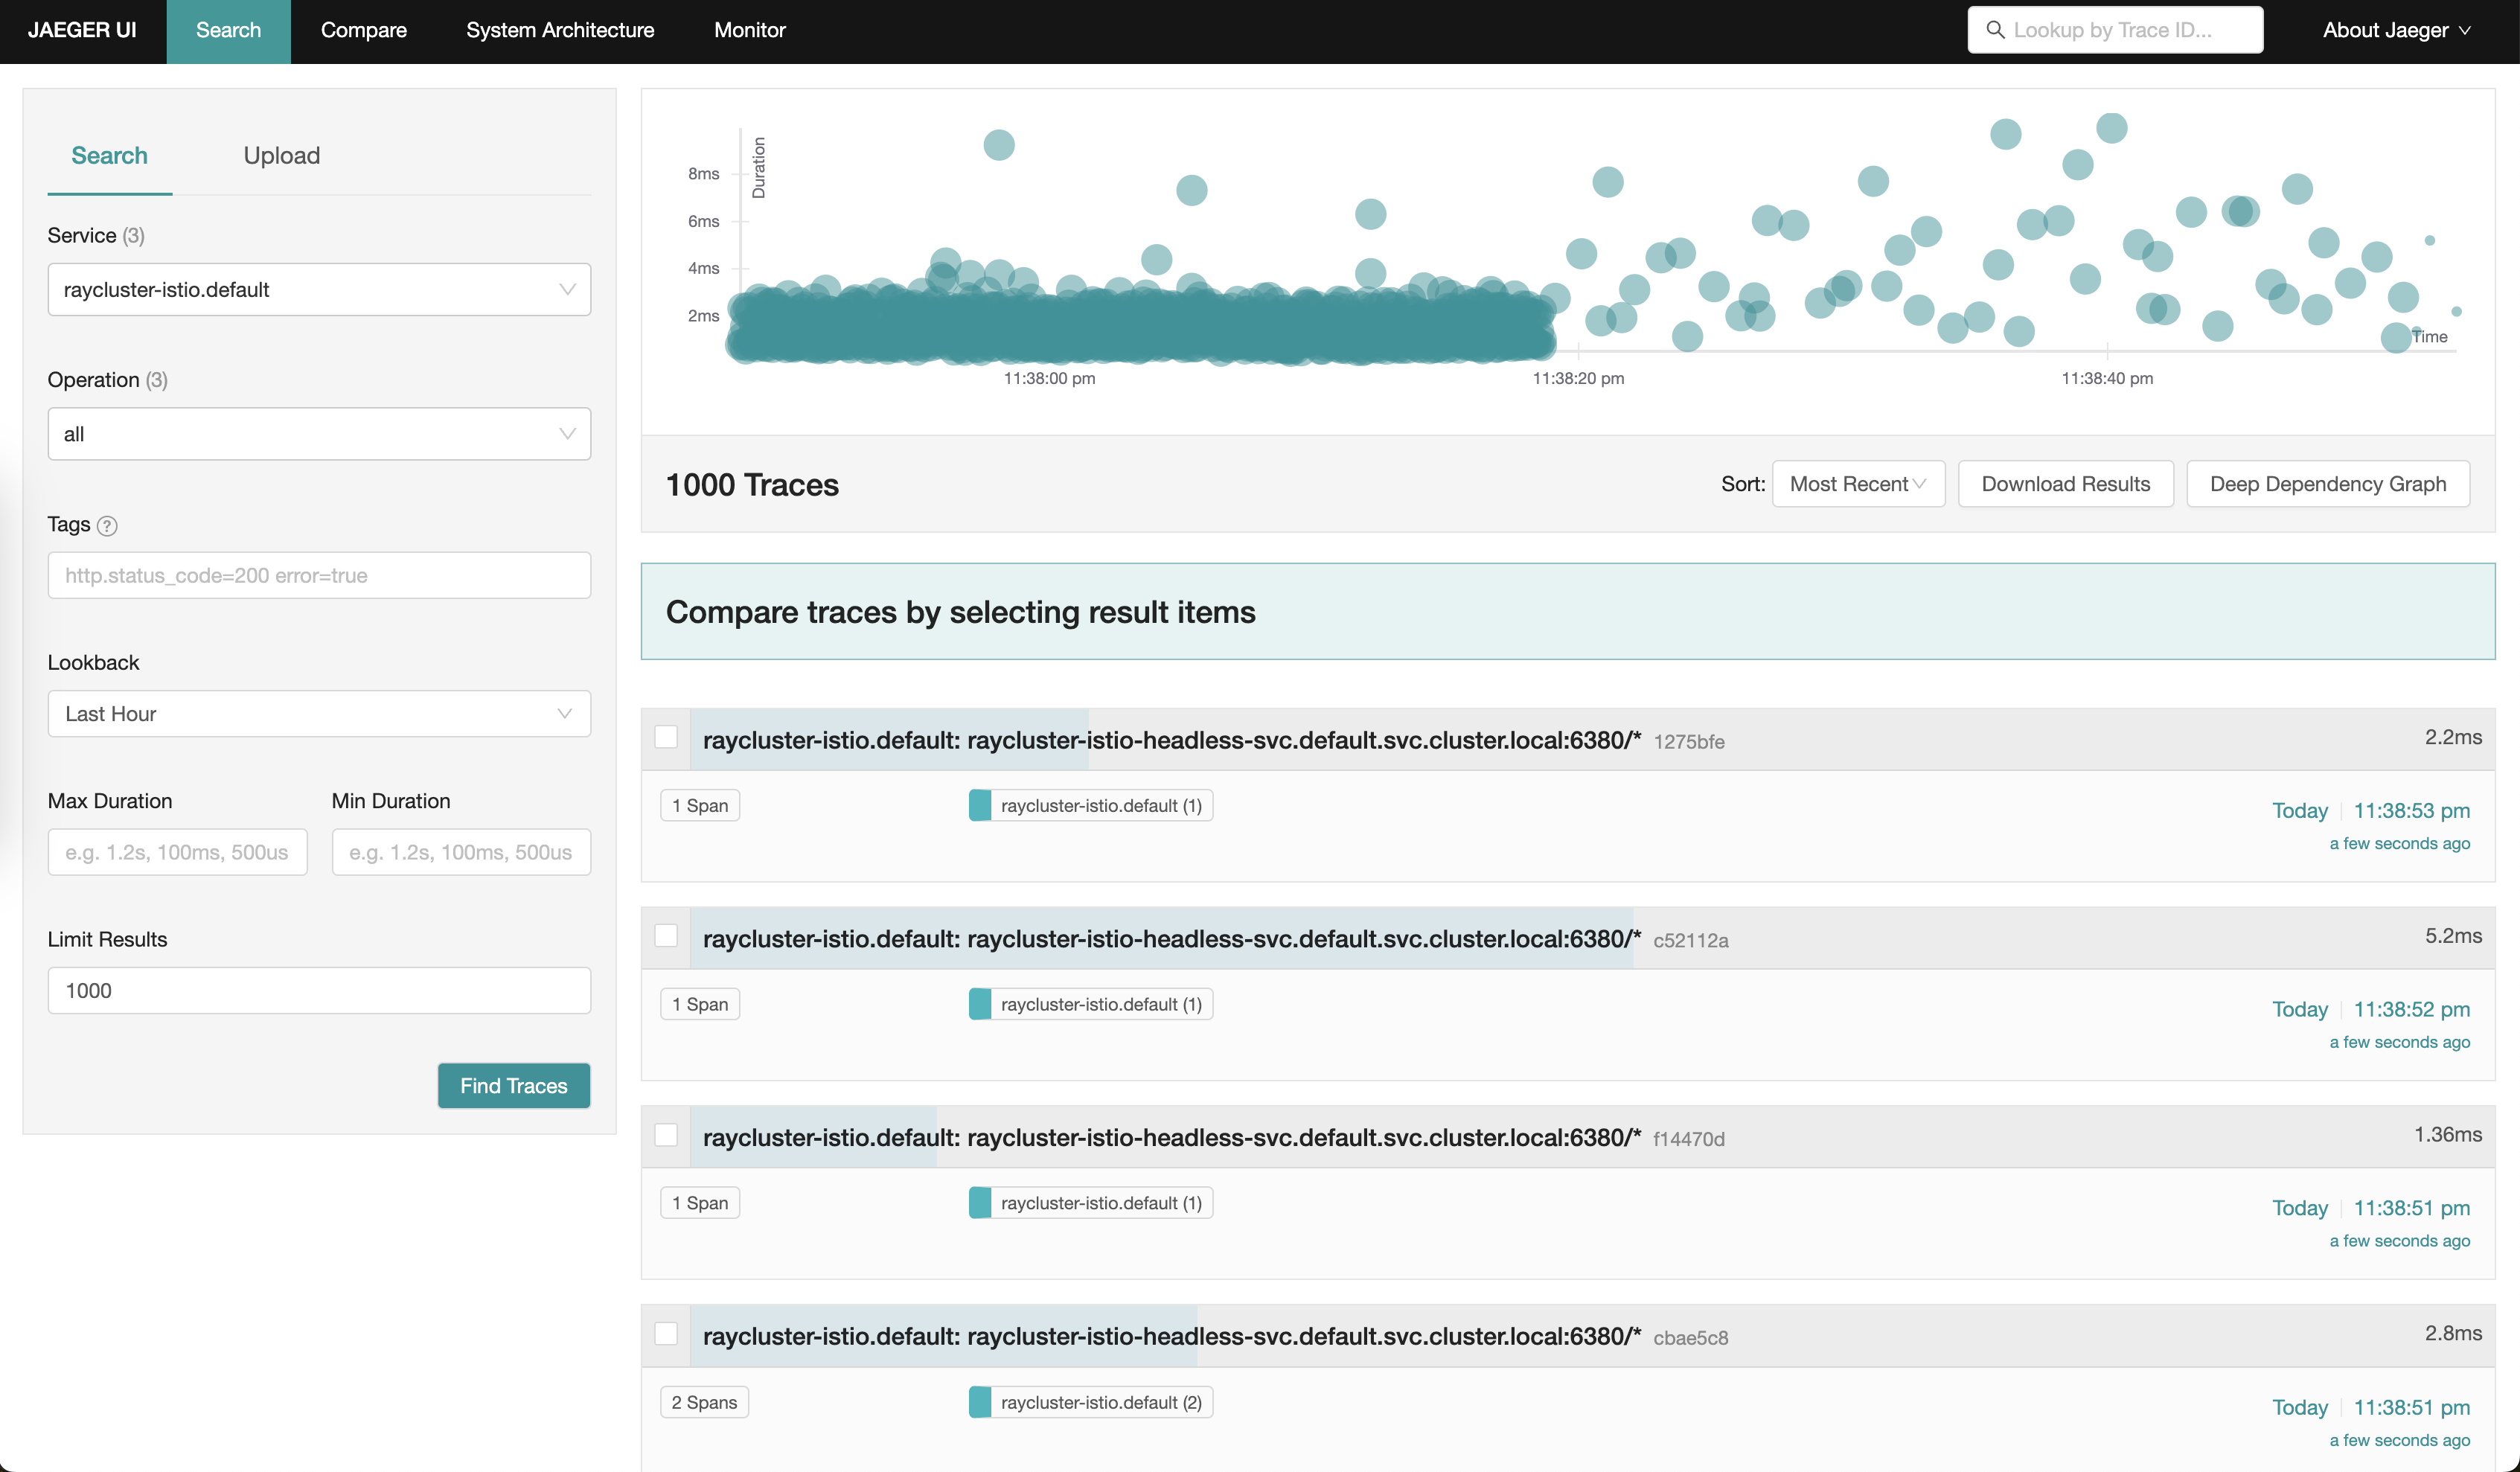
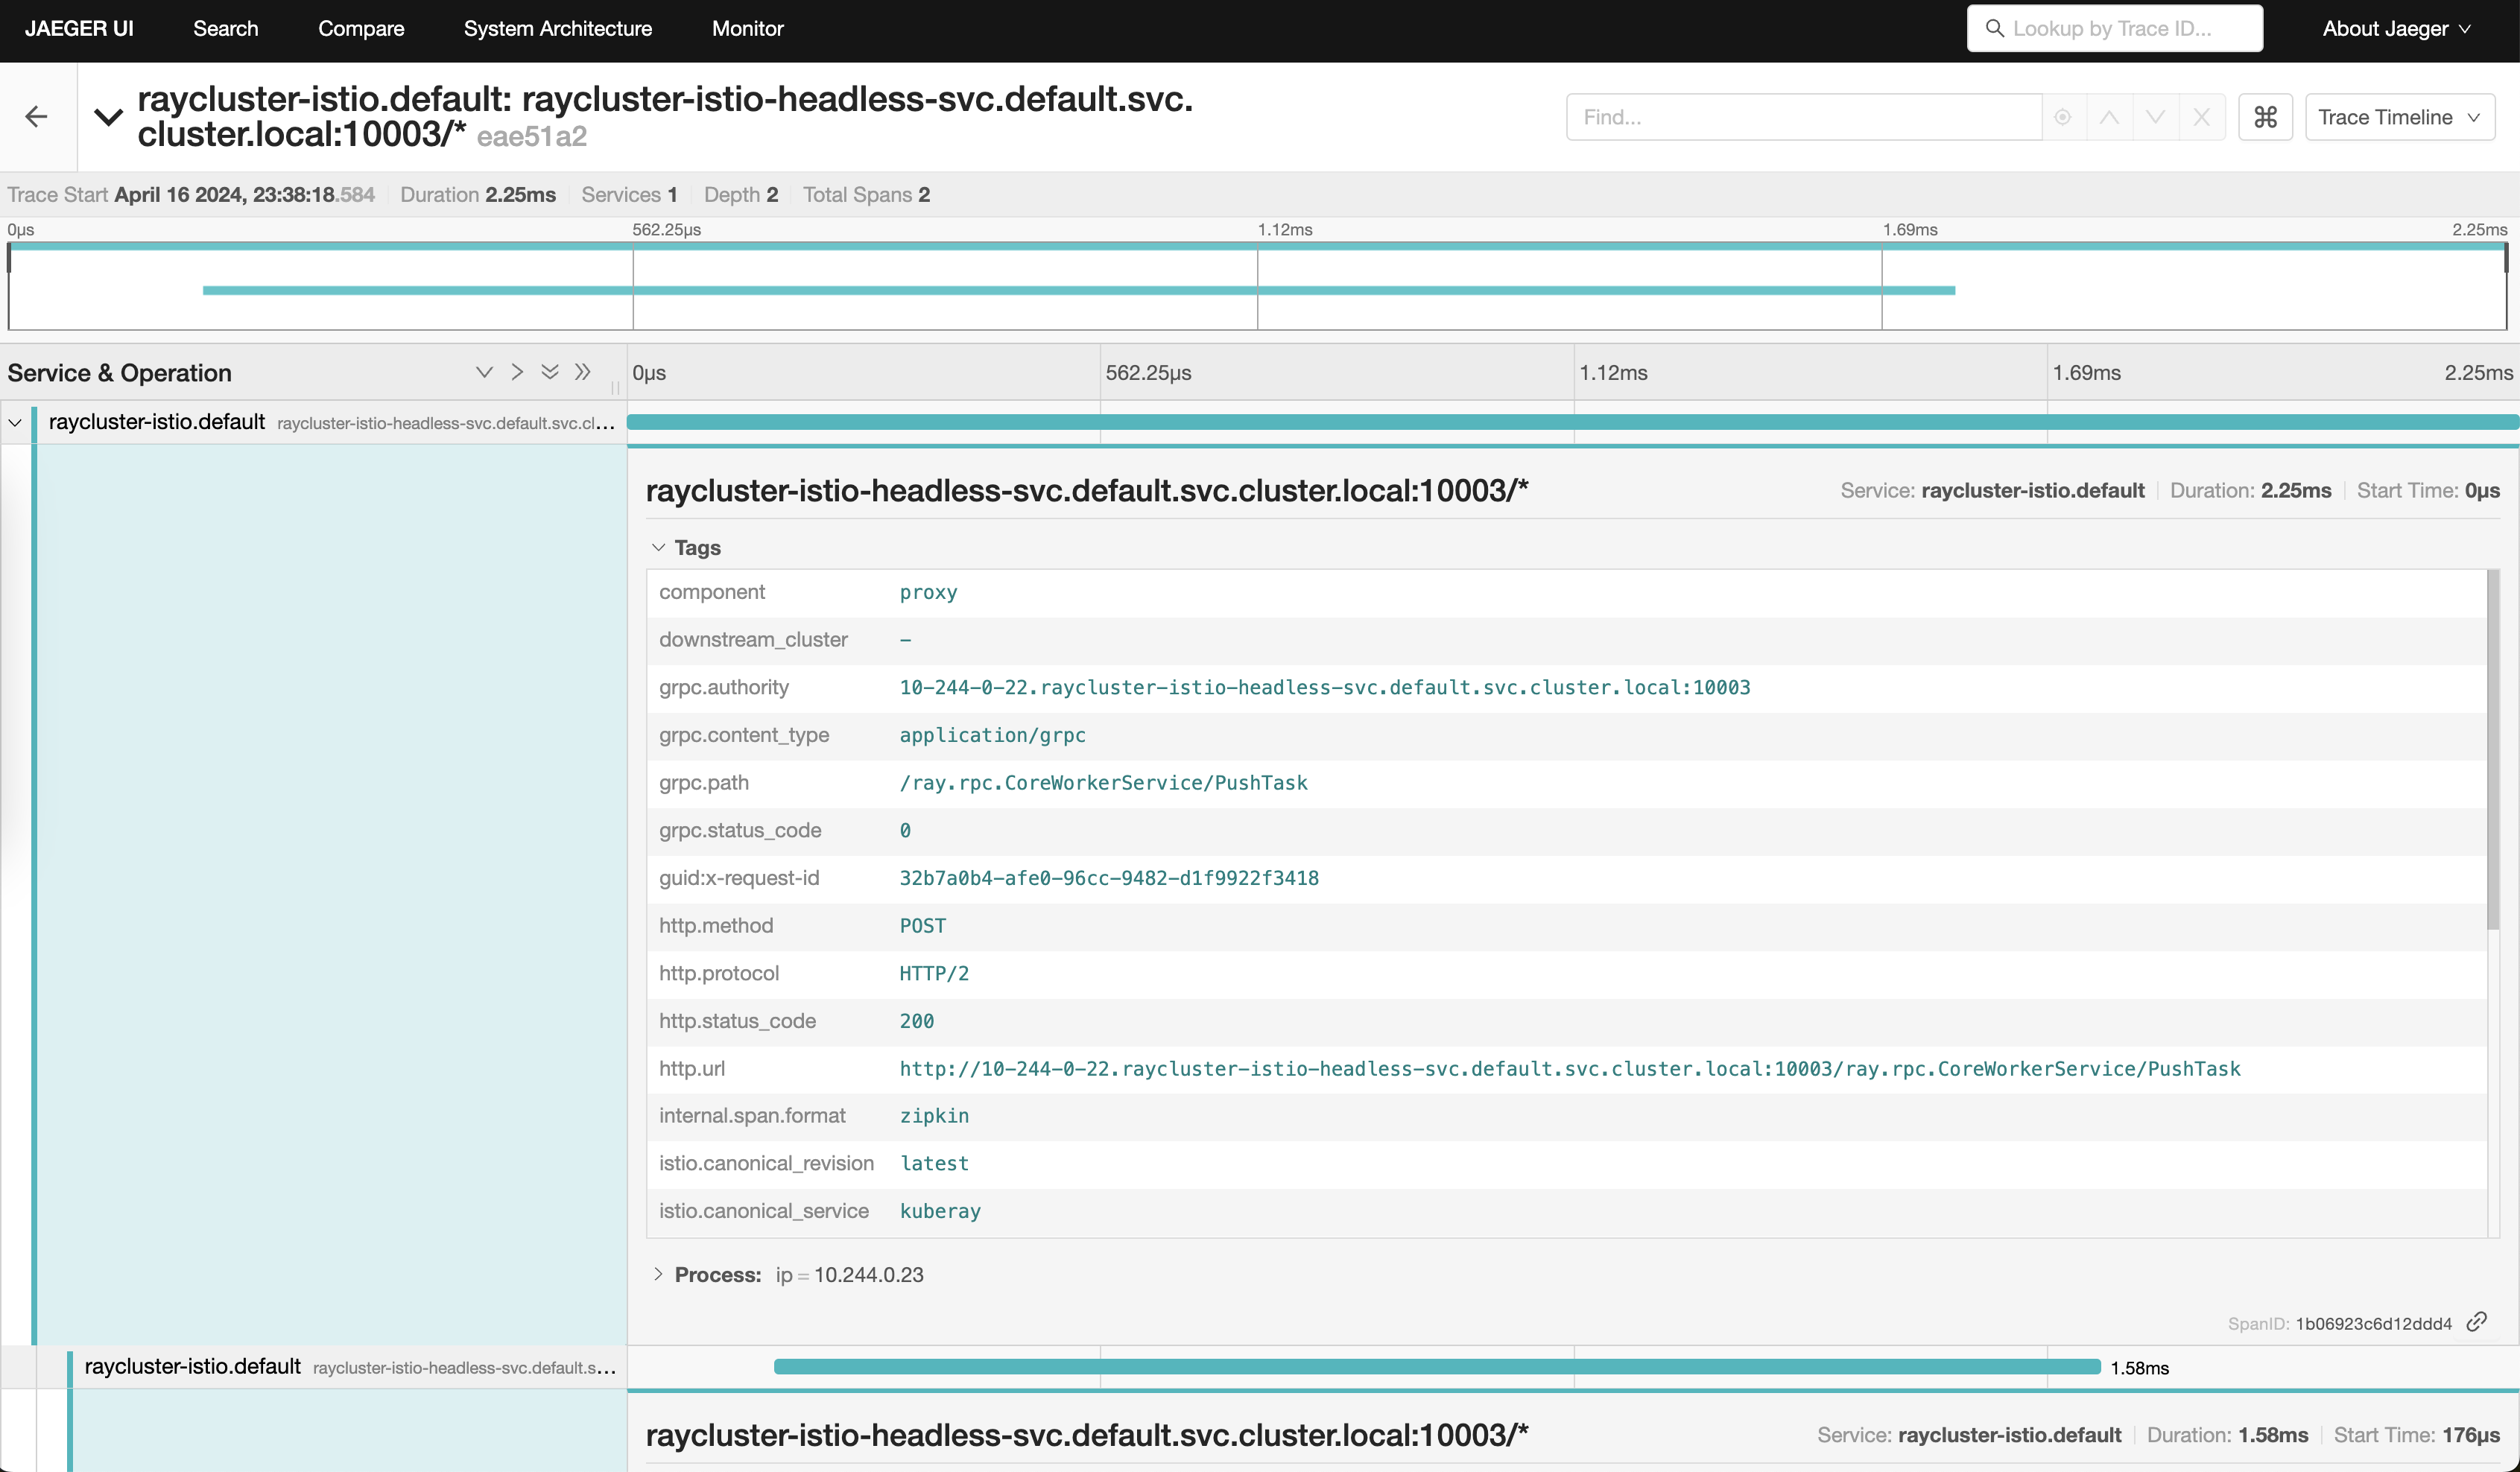
You can click on any trace of the internal gRPC calls and view their details, such as grpc.path and status code.
Step 7: Clean up#
Run the following command to delete your cluster.
kind delete cluster